Rather than relying on a single instance which is a single point of failure, we will explain how you would go about building a resilient hosting infrastructure for your website which is fault-tolerant, to ensure maximum uptime, performance and availability of your site.
This process is simply to demonstrate the fundamentals of creating a highly available WordPress website and does not include the complex routing policies, security measures and production-ready configurations we use for our client website. Please contact us if you would like to learn more about this process and how Web.Eng can help you achieve it.
Hosting your website on the biggest (and best, according to us) cloud platform in the world can hold many benefits for your business. These setups can get complex and time consuming, which is why Web.Eng has decided to focus our efforts in helping customers accomplish this with the highest levels of support.
Not too long ago, business required to host physical hardware in multiple datacentres, manage web servers, database servers, load balancers, networking etc — and for a simple WordPress site the cost and complexity would probably have outweighed any benefits you may have realised.
Fortunately, Web.Eng saw that with AWS Public Cloud, this is no longer the case. You will still require all of the above components, but all are accessible via the same AWS console, and of course as with all AWS services, you will only pay for what you use, rather than have expensive hardware sitting around virtually idle most of the time.

Step 1: Elastic Compute Cloud (EC2).

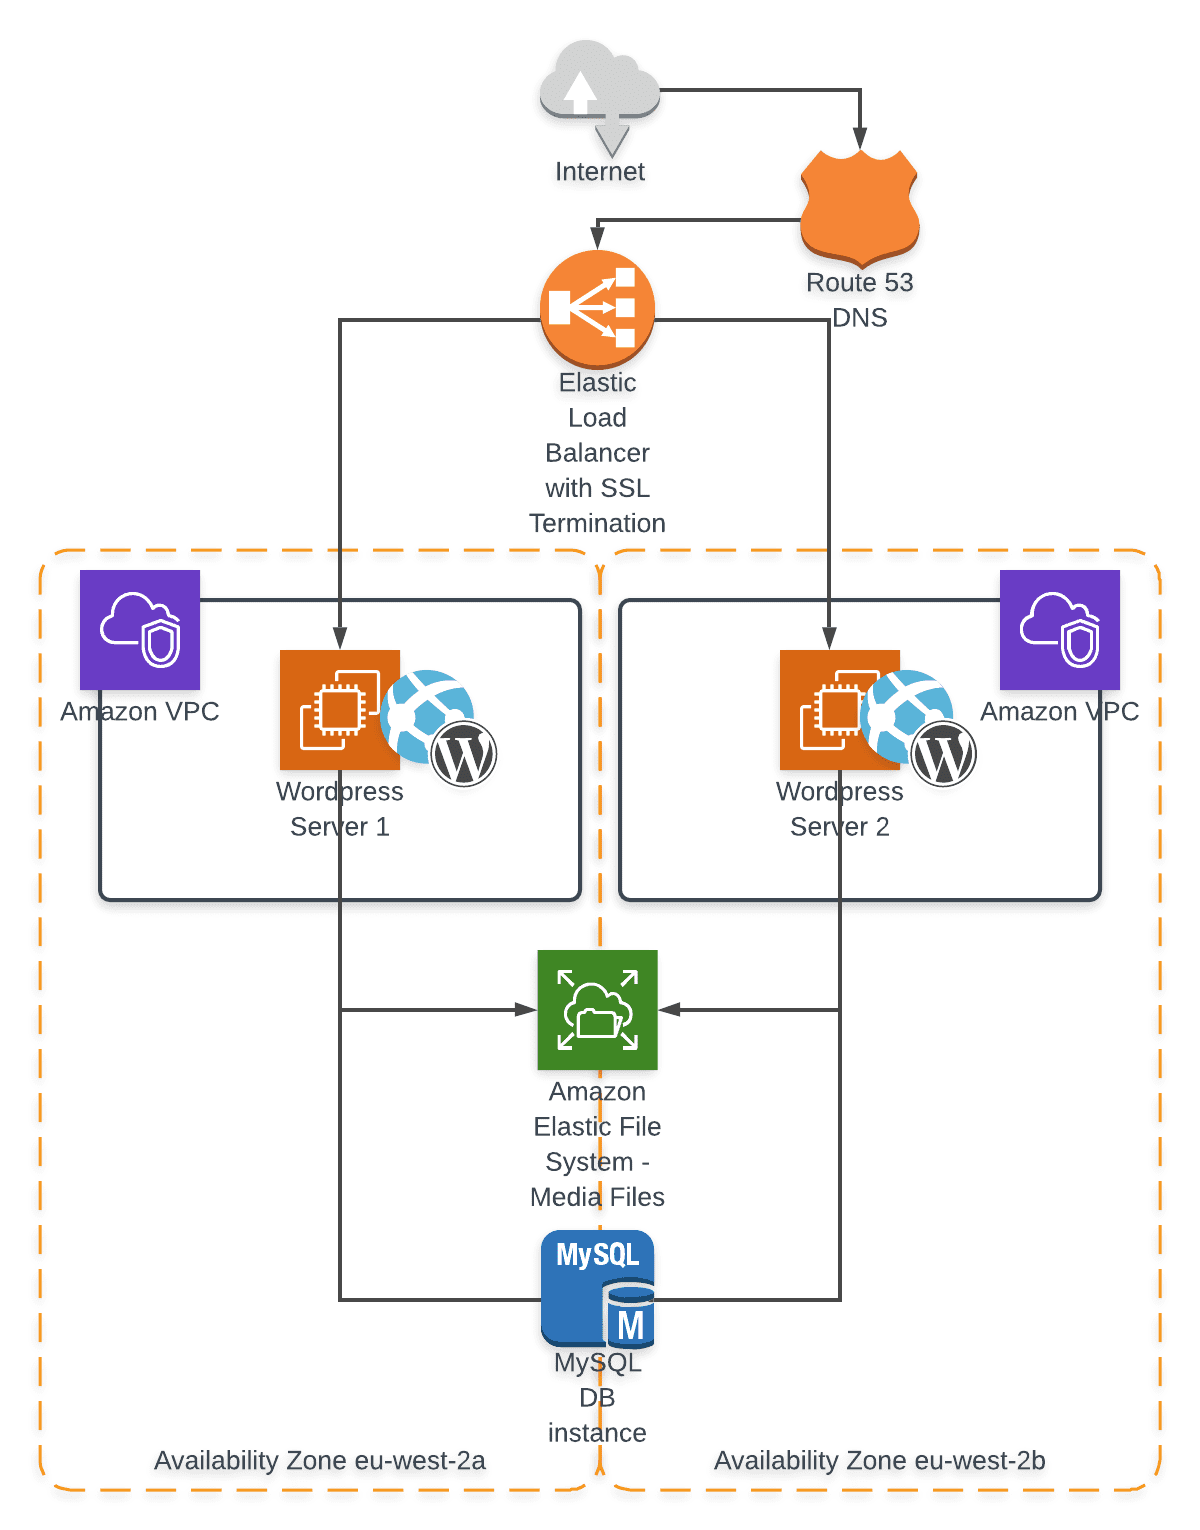
Create an EC2 (Elastic Compute Cloud) instance to run WordPress on. Even though Web.Eng uses a custom optimised process flow to do this, you will still find several pre-configured WordPress AMIs (Amazon Machine Images) on the AWS Marketplace which are pre-configured with all the software you need. You can deploy these AMIs directly from the Marketplace into your VPC — Virtual Private Cloud. If you worry about not having a VPC yet — the first is created by AWS by default. Essentially, this is the networking that your EC2 instance will connect to — one will be created automatically when you go to deploy your first instance. If you already have multiple VPCs you’ll need to specify which VPC you want your EC2 instance to be created in.
Now you have your WordPress server running, you either need to build your content directly on the server, or if you have already built the content elsewhere, you’ll need to back it up and restore it onto your new WordPress EC2 instance.
In this post we’re only going to build in AZ resilience, not cross region resilience. Think of an Availability Zone as a separate physical datacentre — all power, cooling etc is isolated in an individual AZ, so it is unlikely that a failure in one AZ will affect workloads in another. Regions are geographic locations (eg London, Frankfurt, Dublin) containing multiple AZs — generally a region will have a minimum of 3 AZs for you to choose from. An AZ is denoted by the region code followed by a letter identifier, for example eu-west-2a and eu-west-2b are 2 AZs in EU West 2 region — London.
Step 2: Elastic Load Balancer (ELB).

Create an Elastic Load Balancer (ELB) to direct traffic to your servers in each AZ. Load Balancers can be found in the EC2 service in AWS. The ELB can also be used as your SSL termination point if you are looking to host an HTTPS website. SSL Certs can be obtained from AWS Certificate Manager, if you have not already procured an SSL cert elsewhere. The ELB can be configured to perform a health check on your EC2 instances and to only direct traffic to healthy instances. You’ll need to update your DNS settings to point at the IP address of the newly created ELB. You can do this in Route53 if you are hosting your DNS with AWS — if not, use the control panel of your DNS provider. If you are hosting SSL on your load balancer, don’t forget to set the appropriate redirects on your web server so that any HTTP pages redirect to their HTTPS equivalent, otherwise your unsecured content will be available to the web.
Step 3: Relational Database Service (RDS).

Set up an RDS (Relational Database Service) My SQL Database instance. We’re going to run the WordPress database on a separate, AZ resilient RDS instance so that a single database instance is available to both of your EC2 instances in the separate AZs — this avoids having to manage the replication of content back and forth between your WordPress EC2 instances. Be sure to set your RDS instance to replicate between AZs and make sure you deploy in and replicate to the same AZs you are using for your EC2 instances.
Step 4: WordPress Database Migrate.

Export your WordPress database from localhost and restore it onto the RDS instance. Once you have the WordPress database running in RDS, you’ll need to update the WordPress config file to use the RDS database instead of the local database on the EC2 instance.
Step 5: Elastic File Share (EFS).

Create a volume to store media files. We don’t want to store these locally on the EC2 WordPress instance, so we don’t have to replicate between the EC2 instances. For this, we are going to use EFS — Elastic File System. EFS is an NFS compatible file system which replicates your file data between AZs. This will be used to store all your photos, videos etc. Again, be sure to set up your EFS share in the same AZs as you are going to host your EC2 instances. Once you have created your EFS share, you’ll need to copy all your media content into it and update the WordPress config file to point at the EFS share.
Step 6: Amazon Machine Image (AMI).
The infrastructure is now ready. What remains is to clone your EC2 WordPress instance and put into the separate AZ. You can do this by creating an AMI of the instance — this will ensure that all the settings you changed above will be copied to the new EC2 instance. Once you have your AMI you can deploy a new EC2 instance in your second AZ and add it to the Elastic Load Balancer and you should be good to go.

Conclusion
In this post, we’ve explained steps to create a non-production ready highly available WordPress website. We’ve assumed you have some knowledge of using the AWS console, so have not gone into full details for the each of the steps above — please reach out to us if you require any further info or how to make a production-ready infrastructure. Happy building!


